Gesture Drawings (HL2)
(Recommended working time: One Day)
In this assignment students will:
- IWB additions are like half projects in that they are intended as partial review AND partial reference. By creating an IWB addition you are practicing the creative division of space on a page and recording information, practicing drawing, and researching. It is important to make every addition a careful and well planned exercise so think about what you are going to say and how it will look in your IWB when it is done.
Investigation Workbooks (IWB): (1-2 pgs.)
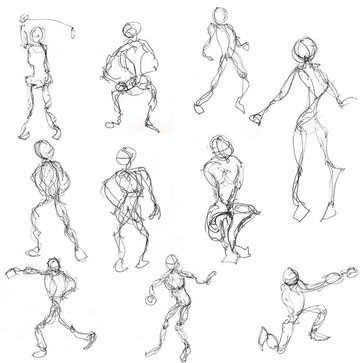
Gesture Drawing Page:
Complete a reference section in your sketchbook that illustrates basic Gesture Drawing to be used in IB Studio Art. Follow the basic step-by-step directions below to add the "Gesture Drawing " section to your IWB
Mounting the Gesture Drawings into your IWB:
(Always save a space at the top or along the side for a page title.)
- Open your IWB to the next blank page.
- If necessary, paint or prepare the page for new information.
- Carefully tear or creatively cut out your Gestrue Drawings limiting the amount of negative space in each sketch (crop the drawings).
- Creatively arrange your Gesture Drawings on the page you intend to mount them allowing some room for annotations next to each one (see expectations below).
- Glue in the samples of Gesture Drawing making sure the samples are well glued down so that they do not become dislodged from the repeated turning of pages.
Authoring the Gesture Drawing Page
- Label the pages of your sketchbook at the top or along the side neatly with the title, “Gesture Drawing Comparison .”
- Using colored pencils, gel pens, or felt-tipped pens, annotate the drawings with the following:
- Major line of action or movements (usually the longest line through the figure).
- Major body parts such as the head, hands, feet, etc.
- Research and discuss the main reasons for Gesture Drawing. Cite your source listing a text based source using MLA format.
- Look for figure drawing books or fashion drawing books in the card catalog.
- Compare and contrast your drawings with examples from the masters. Cite your source listing a text based source using MLA format.
- Hint: Look for the series on the bookshelf of the library titled, "Sketches of the Masters" (or something like that). It is an old collection published in the 60s, I believe.
- Add additional information as necessary to improve page density and balance illustrations to text (about a 50/50 mix).
The Learning Goals:
(This is what the addition will be graded on at the end)
- Completion- Follow all of the directions and ensure the project is complete with titles, sub headings, all visual and written information.
- Density- Pages should be PACKED with information. So much so that a person should not be able to place a quarter on the page without it touching either written or visual information.
- Design- Carefully plan out your pages and specifically place items like titles, subheadings, pictures, and written information.
Assessment: Students may show their work for critique and submit their sketchbooks for evaluation.
 |